Thursday, November 3, 2011

And the shower broke :(

I guess I should be updating more as I'm doing but seem to be having trouble with that.
I went to replace the seals in the old Delta faucet in our bath/shower, somehow I managed to mess it up and water was leaking behind the wall afterwards. The drip from the faucet was gone though!

I guess I forgot to take a pic of how it looked before but this was after cutting out the supports for the old diverter/temp valve and bath faucet.

Heres with the new supports put in and the pipe connected to the shower head and tub faucet, still need to run the hot/cold water pipe to it.

Here's the part that goes through the wall to the tub faucet. Once it's through I glued a threaded fitting on that the tub faucet screws onto.

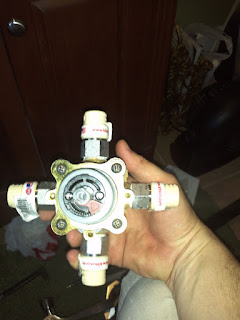
Here's the new valve with fittings, the owners before us put the shower head, tub faucet and escutcheon on but left the old valve in. After doing this I know why! The nice thing with this new valve is that you can control the temp and pressure separately, all you have to do is set it to the temp you like and turn the shower on and off, it will always stay at that temp which is nice.

Here it is almost ready. 

All done except the handle.

Attic closet Pt 1

So here's my attempt to turn part of the attic into a closet. The first part looks pretty good, next is to add a closet bar across the back and move the dressers to the opposite wall which includes moving a vent in the wall. At least it's cool right now as I have to go into the attic to do it.
I had to take notches out of the baseboard so the frame would fit flush against the wall. I figured this would be easier than trying to cut the pattern into the frame itself and if we ever pull the drywall and baseboard to better insulate the attic I won't have to reshape the frame for the new baseboard.


In the two outside boxes of the frame I used drywall anchors to hold the 1x2's to the wall then used 2.5" #6 wood screws to hold the frame to the 1x2s. I used flanges for the closet rod and one support in the middle that is held by the drywall for extra support.

Surge protector outlet

So I found these cool surge protector outlets from Amazon: http://www.amazon.com/Leviton-7280-W-Suppressor-Receptacle-Industrial/dp/B001FB64JE/ref=sr_1_8?ie=UTF8&qid=1320368004&sr=8-8
They function like a surge strip but without the clutter. I used one under the home for the gate opener to protect it.


So these are more pictures than are necessary but I was curious about how it hooked up before I bought it. You wire it the same as a normal outlet but if you want the ground to be isolated you just run a seperate grounding conductor back to the panel from this instead of using the one that goes to the other outlets on the circuit.

Sunday, August 14, 2011

Dining room lighting

One more lighting update, I replaced the dining room light fixture too, it was too modern for the style of the home.
Here's some more scary old home wiring... eek. The stuff is rather brittle. I thought this would be an easy one, just unscrew the old cross bar and put in the new one... too bad on of the holes was stripped.

It would be best to replace the box completely but I thought that if I did that I would have to run some new wiring as the insulation on the old probably wouldn't hold up. Instead I drilled out the hole then tack welded a nut onto the back so a screw will go in like it used to. I made sure I covered the ceiling and wires and we emptied the room of furniture before this part... I'm sure it's not a recommended technique.
 The results turned out great though. This is another of the lights that my wife found online that are about the same age as the home.

Living room light

So it's been some time since my last post. Unfortunatly not too much more has been done but we do have some new lights up. We took the ceiling fan down in the living room and found the bracket for the fan was held up with 6 drywall screws into the ceiling, luckily they much have hit some of the wood lathe behind the old plaster ceiling otherwise it likely would have come down some time ago. You can see two sets of three screw holes spaced out, this was how all that was holding the fan up before.
 I had to make a bigger opening to mount a pancake box against the joist to hold the light fixture. This way it has better support and will make it much easier to change out the fixture in the future, I made sure it was rated for fans too! There were 4 lag bolts that hold teh box to the joist for support.
I found an old Moore Handley Homecenter ad from the 60s or 70s in the ceiling too and a pieice of screen.
 Bought a new ladder too, the one on the right was kind of scary to work on.

 Then we used a ceiling medallion to cover the big mess I made, you can see the box in the middle of the medallion.
Tada!

Saturday, June 25, 2011

Circuit panel install


 Here's the new panel that's going in. Its a Square D QO series panel and breakers.
  Here you go, proof I actually did it myself.
 Much cleaner now that some wires that went no where or were no longer hooked up were removed. You can see the surge protector too, the white rectangle at the bottom of the breakers on the right side. Some more info on it can be found here: http://www.apelectric.com/Square-D-QO-Surge-Breaker-p/qo2175sb.htm, they sell it there too but I found it for less at my local Home Depot. It's meant as part of the total surge solution, I still need to use surge protectors on my electronics, this is supposed to knock the surge down to the level a surge strip can actually handle. Unfortunately while doing this I discovered the only ground my house has is the gas piping which is supposed to be connected to the ground system on the home but not used as the ground. I've purchased 4 ground rods, two for the home and two for the garage and will post an update once I get them installed.

 You can see some of those cables that went nowhere. Now I need to crawl under the house and remove them. Ugh. It's normal practice to just cut them off but since there are so many and I want to rewire some of the home it will make it easier on me in the future to take the extra time and actually remove them now.

So that's it for replacing the panel. I had been quoted $1250 by an electrician and purchased the box for $150 shipped brand new from eBay and the breakers and surge protector I got for $250 at the local Home Depot. Now I've got an extra $850 to go towards my other projects, yay! More work!

Circuit panel removal

So part of the requirements to keep my homeowner's insurance after moving into the home was to remove the old Federal Pacific Electric Circuit panel. It appears that despite being a popular company a few decades back they are now looked at as a fire hazard. Two sources of more info on these panels: http://ismypanelsafe.com/fpe.aspx and http://www.inspectapedia.com/fpe/fpepanel.htm. Here's the old panel:
As you can see it was quite mess, looks like random things were added or removed throughout it's service. You can even see a doorbell transformer in there, needless to say that should not be mounted in a circuit panel, let alone be just put in hanging from the wires!

At least they used proper clamps to hold the wires.


 Some of the old wiring that's original to the home, it runs to all the light fixtures and the outlets upstairs.
 You can see how the old insulation was brittle and frayed in some spots.
 Luckily this wire was long enough I could cut off the dmaaged part in the new box.
Here's where the aluminum service wires enter the main breaker. Both carry 120 volts but at a different phase so when you run both to an appliance you get 240 volts for the heavy duty appliances like the stove, dryer and A/C unit.


No more power! Good thing it was a cool day.

Friday, June 24, 2011

New outlets.

Woo hoo, now we finally have an outlet under the sink for the dishwasher so we don't have to run the cord across the floor. The other one's for a garbage disposal. And they actually have a functioning ground! Whoever ran the wiring before just cut off the ground wire instead of hooking it up, now it's fixed.

Monday, June 6, 2011

Possum

:::No animals were harmed in the making of this post:::
Well, apparently I should have hooked up they dryer vent sooner, I was doin' it Westside and would just open the garage door and run the dryer with the vent facing the door. I went to use it today and some leaves and a plastic bag blew out. When I looked into the vent on the back this was the cause.
The poor little thing was a baby, we finally got it to run out, trembling as it escaped under the work bench. This was motivation enough to get me to install the vent! Now we can use the dryer with the garage door closed! Hooray!

Monday, May 30, 2011

Interior shots

Here are some pics of the inside now that we have most of the furniture. The next big project I have to post is pics of the circuit panel I switched out.
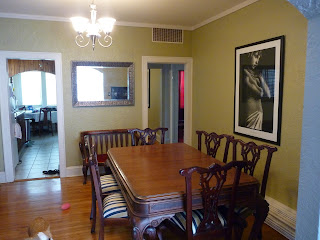
Here's the dining room. You can see the top of Charlie in the bottom left.
The living room facing the front door, with Maggie :)
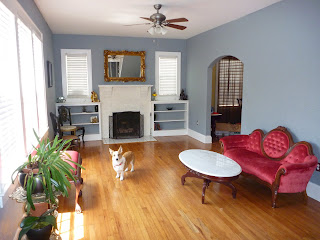
The living room facing the fireplace.
Long shot of the living room facing the fireplace with Charlie.

Thursday, May 19, 2011

Replacing the drain pipe for the kitchen sink.

After about a week or two of getting the home the kitchen sink stopped draining. First thought, no problem, probably just a clogged trap under the sink, boy do I wish that's what it was.
 

 I had to keep taking apart more of the cabinets and move the fridge to even get to the pipe itself, the drain pipe had to be off to the side since the vent has to go through the roof and there were windows above the sink.

 You can tell from this and the next picture the pipe had not been doing so well lately.

 Here are some pictures of the cool pipe cutter I rented to break the cast iron pipe, you just tighten it, move it side to side to score the pipe then tighten it some more and the pipe just snaps! Tool would have cost $550 to buy but I found a local shop renting it for $12/day.
You can just see the riser clamp in this picture too, the long horizontal piece of steel, this clamps around the pipe and rests on the pieces of pressure treated wood I screwed into the studs, this keeps the cast iron vent that runs all the way through the roof from crashing down on me when I cut the pipe.
In hindsight I should not have used pressure treated wood for this as the only type of metal it can be in contact with are hot dip galvanized and stainless steel. I had the proper screws for it but had to put a piece of plastic between the wood and the riser clamp so the riser clamp doesn't rust away.
You can see some of the scale and buildup in the pipe here, the whole thing was pretty bad, and it was completely blocked at the sanitary T, where the horizontal pipe transitions into the vertical pipe.

We think she might need more iron in her diet, she really liked licking this pipe.